Did you know?

A "Pandula" is a flower which blooms only in one's imagination.

Pages

Wednesday, August 31, 2011

New pebble weave warp!

August 11, 2011

This warp did not come easily!  Not only did I have threading problems and have to manually re-pick the sheds, but I ran out of heddles, twice.  So TWICE I had to stop and make more.  Basically it took me all day just to do the heddles. 

As this is only my second pebble weave project, I am still happy with just the pebbles.  No designs yet.  I like it so far.  I forgot to take pictures of the other side, but will do so soon.  It is a reversible weave.  The other side is light pink with dark pebbles, opposite of what you see here.  This is a perle yarn, and as a result has lots of shimmer.  Difficult to take good pictures, so I hope you can see it reasonably well.  I will work on better pictures.

You also get to see a picture of how I am tying up in the new digs.


Unfortunately the very end corners of the window sill (there are 3 huge windows) are the only ones deep enough for a C-clamp to catch and hold.  So I am using only one fixed point, another learning curve to be sure as it wants to wobble a bit.  The red piece that you see is a piece of rubber to protect my friend's window sill, the clamp is also red so a little difficult to see.


Monday, August 29, 2011

Pipe loom project!

August 10, 2011

Through no fault of switching this warp from a backstrap loom to a pipe loom, I had a lot of problems with this it.  Threading sequence issues mostly.

It seems the warp was a little wonky tension wise also.  I find this to be problematic, especially on a frame/pipe loom.  In other words, one side of the loom is slightly longer than the other.  This means that to get even tension all the across the warp, you must crank one side of the loom up higher/tighter than the other.  This creates an angle in the top bar, which makes the warp try to slide to the side that is lowest, simply by gravity.  If you tighten it up enough to prevent most of this, it is too tight to warp face weave comfortably.  If it loosened to the point of comfort, on side of the warp is baggy and troublesome.  It is alot easier to have floats and missed threads in a very loose warp.  Lots of room for errors in general.  Plus it will look different from one side to the other side.

So here are pictures of what I could salvage from the project, be assured that I am back on my backstrap.  Working diligently on getting a workable system going again.  Pictures will be coming soon.

As you can see they are small and I sacrificed alot of the warp by starting over three times and trying to work out the 'kinks'.  This is the front side.


If you look closely you will see the back side of the one to the far left.  The green is double stranded with two shades of green, the white is single.  Notice how it made the white threads pull to an angle, kind of like little v's to make the design on the back.  Interesting.  I kind of like it.

These pieces have no particular destination at the moment, they are just in my box of things that will probably be gifted out, maybe even at Christmas.


Friday, August 26, 2011

Conversion from backstrap to pipe loom.

August 7, 2011

Previous set up in my new home with the backstrap loom.  Notice how I have to brace the chair with my feet to keep it from coming into my lap.  Painful on my hips to sit with my legs straight out after a couple of hours weaving.  Probably because I have to keep pressure on the chair to keep it from coming over into my lap.


So I went to storage and got out my Archie Brenan Pipe loom.  Laid the backstrap on the bed (it was already totally set up and secure), slid out the loom bars.  Slid in the pipe loom between the warp layers (this is a rotatable circular warp).  Then extended the loom to the correct tension with the nuts you see on the threaded side rods.  Easy peasy.  No more hyper extended legs, and alot less hip pain. 

Now I simply lay the far end against a table in much the same fashion alot of folks use their rigid heddle looms.


The two Home Depot sticks are my lease sticks and have been pushed to the back side of the warp.  They are usually just to the backside behind the top beam as stoppers on this circular warp.  Unfortunately I had a few issues with this warp and moved them further down so that I could organize the threads.  All of the problem areas are to the bottom of these sticks and will be fringe at the end of the weaving.  It was the only way I could keep from trashing this warp of very fine threads.  My heart is definitely not in this one.


Wednesday, August 24, 2011

New project!

August 5, 2011

New project for the Facebook Color Challenge group.  KraftyMax started these challenges.  Not a contest, no pressure.  Just creative people doing what we do.

Every 2 wks. new colors are chosen and each person gets to post their project on the group page.  

This one is green and white.

The warp is right at 90 threads per shed = 180 threads and it is a 68 in. long circular warp.  No idea's yet for design factors.

But first...Wiggles seems to be paying quite close attention to this one.  

Gotta love the Yoda ears!


The warp.


Boy do I miss my dresser for tying up to.  This set up makes my hips hurt.  I have to keep pressure on the back of the chair to keep it from pulling into my lap.


And here you have my mark!


Monday, August 22, 2011

Purple Peace signs!

August 5, 2011

I have finished the purple 'Aye' strap with the purple peace signs. 

I have it folded but not sewn up yet.  To the right you see what was left over warp and I just kept weaving.


Notice that the hearts are both right side up!  Next time I want to get all of the motif's running in the correct direction.

Here you get to see the back side.


Friday, August 19, 2011

Dana is doing pebble weave!

August 2, 2011

I have kept in touch and collaborated with Dana on Pebble Weave!  This girl is a whiz kid when it comes to this weaving thang!

Wednesday, August 17, 2011

Aye's envelope bag! Purple peace signs!

July 30, 2011

Originally I wanted to alternate purple heart, white peace sign both right side up, then white heart and purple peace sign both upside down.  Well it turned out that I didn't like the way the white motif looked.  Also turned out that my charted peace sign was VERY elongated.  So lots of un-weaving, per usual...LOL.

Then I did indeed get a peace sign completed that looked almost right, now I have also done the second one and it is even better.

I actually have a plan for this weaving.  I knew when I warped about what width I would get.  I also knew about how long and wide I wanted the envelope bag to be.  What I didn't know was how large the motif's would be, so there are going to be some wingin' it going on there.

It is intended to be for my friend KraftyMax's daughter, Aye.  Her favorite color is purple, of course.  I want to make it where it is carried over one shoulder and since 'peace signs' are her thing I thought hard about how to make them show up right side up on the side where the closure flap is.  So far so good.

Notice my home-made loom bars and sword!  Even the pick up sticks are double pointed needles I made myself!


I absolutely love the way double stranding two threads of the same color but different shades gives that steaky look!


Monday, August 15, 2011

This is all I got out of the Hand spun warp!

July 30, 2011

I got 10 in. of woven web...what a waste.  It just keep shredding and breaking the warps.  It is the blue and white stripe piece.  Just have to spin it even tighter and firmer next time.  12 in. total length out of a 66 in. warp.


So here is the new warp.  I have charted up a 60's style peace sign and warped in the favorite color of my favorite 11 year old.  I will be making her an envelope bag with it.


The purple is double stranded, I love to do that and get that streaky look to the warp.  You can see it a little better in the pictures below.


Friday, August 12, 2011

Another failed warp! GRRRRRR!!!

July 29, 2011

Day before yesterday I decided to re-warp my my backstrap loom.  I wanted to have a sample to show folks and I also wanted to go downtown and sit in the town square and weave.  I though it would be MOST impressive if I used my own hand spun yarn also.  WHAT THE HECK WAS I THINKING?

It turns out that my yarn is pretty textured/nubby.  Probably because I made my own puni's for alot of it.  Even though it has been boiled for strength, and most of it has been double spun, it still wants to pill and shred.  I am so aggravated with it.  I have to un-pick the cotton off of the heddles with EVERY shed.  Very tedious and annoying.

For the moment I will only be spinning for the sake of demonstrations and socks.  It is definitely a good attention grabber, especially in the southern states of the USA.

Unfortunately I made a 33 in. circular warp.  This means I have 66 in. of it!  If I can't make it work that is alot of wasted yarn and time.  

Keep in mind that since I am in an entirely new environment I am also trying to figure out how to use my feet for bracing the far end of the backstrap loom.  This means that it is pretty much trial and error to figure out the length needed.  That is also why I need to use a circular/rotatable warp.  If I had to roll up the woven web as I went it would become to short to reach my feet.  If it is too long then I can't get enough tension on the warp to weave.  LOTS of learning curve going on here. Good thing I have enough loom bars for three entire looms.  I can always set this one aside if I don't want to waste it.  Unfortunately I can't seem to think of a way to save it if I don't weave it.  It will in all probability end up in the trash can.

I did take pictures though.


Wednesday, August 10, 2011

Back in beautiful St. Augustine, FL!

July 28, 2011

I am back in St. Augustine, FL and mighty glad to be out of podunk Moultrie, GA!  I have been here 8 days and am getting settled in reasonably well.

I had sort of made a game plan for when I got here as far as finding work goes.  First I wanted to try to get on at Michael's Craft store, maybe even instruct weaving classes.  Then maybe try Hobby Lobby, also a craft store.  I also wanted to look into the Historic Spanish Quarter where they do reenactments and have things like a blacksmith, spinners, weavers and such.  I think that may even be a state job, wouldn't it be great to get into that.  The only drawback there is that they dress (of course) in period costume and they are outside.  Which means they are in LONG skirts, usually wool, hair bonnets, long sleeves and it gets over 100 degree heat index here on a regular basis.  Then of course I wanted to get in touch with the St. Augustine Textile guild.  They had asked me to participate in the reenactments a couple of years ago, and even asked me to teach tapestry.  

I have also been asked by Weavolution.com to give on line classes.  (I actually think I would indeed have more students that way than I ever would in FL.)  At the time I didn't feel particularly qualified to teach any kind of weaving and actually said as much to the lady that approached me.  Her reply was "You know more than we do, you do it every day and most of us have never done it."  I still wasn't convinced.

Now, however, I believe that I am.  After having instructed at the Art Center in Moultrie, and being closely involved with the on line weaving/spinning community, I have come much further with my skill set.

I went into Michael's day before yesterday while spending a wonderful day out and about with my LONG time friend KraftyMax and her daughter.  We also had lunch at my favorite marina and I got to see the ocean again.  Smell those oyster beds!!!!!  That means I am home.  But I digress...It turns out that our Michael's is actually hiring permanent, not just for the holiday season.  We have also have two retail outlet malls here and this is when most of the stores start putting on the holiday help.  I left a business card with my web sites listed on it, and found out that you have to apply to work for them on line.  So I came home straight away and filled out the application.  I was told that it takes 24 hrs. for it to be visible to them, so I will be giving them a call...or maybe even a visit today.  I also want to hand them a resume so they have my personal references since I haven't worked in so long.  

So please talk to the job gods, or whoever it is you talk to and cross your fingers, toes, legs and anything else you can think of.  I need to work and this is the exact place I want to work.

I also found out that we now have a small Bus service here in St. Augustine called the Sunshine bus!  Picks up 1/2 a block from my house!  Starts around 6 a.m. and ends around 7:30 p.m.  The only hitch there is that Michaels stays open from 9 to 9...BUT, we do have taxi cab's also.  First I have to actually get hired!

This is the historic Bridge of Lions in downtown St. Augustine.  I had forgotten how beautiful it is.


During the holiday season the bridge and the entire downtown area is lit up with white, and only white, lights!  It is truly gorgeous!

Monday, August 8, 2011

Finishing technique for warp face fabric.

July 26, 2011

This is a system that I devised myself on how I start and end a warp face weaving.  I have found that it won't come un-woven and can withstand storage or use until it can be sewn, or left just like it is.  It is certainly not the only way to do it, it is just my way to do it.  

I have been asked by alot of the ladies on Ravelry to explain with lots of pictures and since I did it for them, I figured I may as well post it here on my blog.  I hope it helps anyone who may be interested.

There is an explanation above each picture.  In other words when you read the explanation, please look at the picture below it.

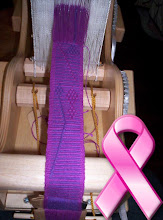
In the first picture you see that I have passed my weft from right to left and left the tail hanging out.  The tail eventually gets cut off.  I then cut a piece of weft the size I want for the space I need to weave.  In this case I cut  around 24 in. as I want to end with 10 rows of each stripe color = 20 rows (sheds) total.  I always start and end with these 20 rows to get the width established at the beginning, and to make it the same, for design balance purposes at the end.  I then place the new weft into the same shed, with equal amounts hanging out of each side of the weaving.  Bring it down to the fell line and change sheds and beat the weft.

Then, take the right hand weft and pass it through the shed to the left.  For a moment you now have both wefts on the left hand side.


Then I take the one that was already on the left and pass it through the SAME shed to the right hand side.  Check my edges to make sure they are neat and my width is consistent, change sheds, beat.


Here you see the result.  Again a weft is sticking out of both sides of your woven web.  Now you repeat the process.


The right hand side goes through the shed to the left.


Then the weft on the left hand side goes over to the right hand side through the SAME shed.  Change sheds and beat, even if it is the last row I change sheds and beat, the weft stays put better until I can finish knotting that way.  I usually continue this for my 20 rows and leave enough weft hanging out either side long enough to make it the same length of the left-over warp.  This way it is the same length as the rest of the fringe and looks nice and even.  If I decide to twist, or braid there are no little short piece's that don't act like they should.  

If I decide to sew it into something else I just cut the fringe later while assembling the piece.


Now I go to one edge and separate the last two warps, one from each shed, and add my excess weft in with these two.  I cut them at the furthest point that I can and I then tie an overhand knot with all three at once.


I then go to the other side and repeat this.  I now have an overhand knot at each edge with two warps and one weft in it.  


Then on a band this narrow I would usually just take two warps from the very center point, one from each shed, and tie another overhand knot.  For demonstration purposes I have spaced them out like I would on a wider piece so you can see them.  

Then I take the piece off of whatever loom I am using, in this case the backstrap loom, and do the same knots on the other end.


Then I trim the fringe to be even on both ends.  I can actually leave the ends like this indefinitely without fear of unraveling.  If somehow one weft were to come out (and it won't because it is knotted) then there is still another one in the shed keeping the structure of the fabric stable.  It can actually withstand alot of use and I have never had one come undone finished out this way. I have even machine washed them and they hold up beautifully.  Of course as with all hand woven textiles I use the gentle cycle, and sometimes I even put them in a pillow case and tie a knot in the end to protect them as they wash.  But even without the pillow case they hold up very well.

I have found that since I use these pieces quite often to make little purses have a little more thickness at the beginning and the ending have been beneficial.  If it is thin, or loose it doesn't hold up well when making the closures.


So this is my technique, please feel free to use it and tell your friends if you think it will help them, where they can find this information.  

One last thing...alot of folks told me that this is an unnecessary waste of time as warp face weaving's don't un-weave.  HOGWASH!  If you use a smooth yarn, as most of us try to do in warp face weaving, they will indeed un-weave.  Ask me how I know.  Some indigenous weavers use things like wool, or alpaca, camel and such.  Some of these won't un-weave, depending how they are spun.  IF it is hairy/sticky it makes the weaving a true nightmare, so I never seem to complete the piece anyway so un-weaving is a moot point.  Opening a shed with hairy yarn is very difficult.  

The smooth yarns like the mercerized cotton yarns I favor, will indeed un-weave.  My thoughts on this are pretty simple, if I went to the trouble to hand weave a textile, I DON'T WANT TO RISK IT UN-WEAVING.  Better safe than sorry.

Just sayin'.

Friday, August 5, 2011

Moving is such a pain!

July 25, 2011

I am trying hard to get settled in here at the new place.  Did a little bit of cotton spinning just to relax.  It spins up so fine I have been spinning and spinning and spinning and it just doesn't seem to grow much.  LOL par for the course.

I have also finished the little warp floats galore circular warp I had been working on while still in Georgia.  I finished it yesterday.  Now I can warp up again to see if I can get the length correct for bracing the back beam with my feet.  Difficult to find a place to tie up here in my new digs.

Not sure what this piece will be when it grows up.  Ms. Carol requested a lipstick tote.  Kind of like the red and white one I did for feminine objects.  I am just not sure I can find time to finish it before I see her next Sunday.  I forgot a couple of things and she is going to stop in with them on her way through to her new home.

For now here is a little eye candy.


Wednesday, August 3, 2011

Warp floats galore and a circular warp.

July 14,2011

My second circular - rotatable - warp. It is done in #10 100% mercerized cotton crochet thread, once again I have re-established that I don't like working with such fine yarn on a backstrap. This warp is 30 in. long x 2 equaling 60 in. total (front and back of what you can see) and it is just a little too short.  My objective is to figure out what length I need in a circular warp to use my feet instead of having to tie up to a fixed object.  The last one was 36 in. and was much too long.  I have also tried a 27 in regular warp and it was much too short.  Thus the in between of 30 in.  I think the next one needs to be 33 in.  I need more warp to wind around the brace beams at both the front and back ends of the loom.  This locks the circular warp in place so you can beat without the warp rotating/slipping.

I am also playing around with warp floats galore with my own designs.  So far just my usual hearts.  No chart just winging it.


Monday, August 1, 2011

One more Envelope pouch!

 July 10, 2011

Today I finished up my favorite of all time long band.  I made it into a wonderful envelope pouch.  Selfish as it is I am keeping this one for myself.  It is actually the largest so far and can be carried as a small purse.

It is made with cotton and silk.  The strap is removable if I need to also.  

It just has a string tie.  I couldn't find a button I thought would do it justice.  So I decided to let the bag speak for itself.


This is the last one for a while.  I am all out of bands that are suitable for making any more.  I am very happy to have found a purpose for all of the bands that started out intended for the failed poncho project.

Dana came by to show me the progress on my 'purse' that we are doing together.  It is going to be so awesome.  It makes me very sad to move away from her.  I have so loved having a 'like-minded' friend who understands my passion for the weaving/fiber arts.  Instead of always having to explain what I am doing, or watching someone's eyes glaze over as they pretend to be interested.

Dana you are the best.