Did you know?

A "Pandula" is a flower which blooms only in one's imagination.

Pages

Showing posts with label Pineneedle baskets. Show all posts

Saturday, January 3, 2015

01/03/2015

It's not quite finished, but it's the biggest basket I have done to this date. So far it's 14 inches long and a little over 2 inches tall 7 inches wide. 

I might even put handles on this one.


Tuesday, December 16, 2014

12/16/2014

I have been a busy little beaver today. And I'm so proud of myself I could just spit. LOL

First off I should tell you I'm anything but a seamstress. But my knees ask me to make some pillow covers for her two-year-old's favorite and I quote "nasty pillow".  He's in love with the ninja turtles and so the fabric she handed me had ninja turtles on it.

 I wanted the pillow covers to be tough, you know for a two-year-old. Attractive and functional to the point of safe. In other words no ties for him to choke on our get wrapped up in.  So I made overlap pillowcases. Kind of like pillow shams, and of course I doubled the seams so that if one seam pops the other will  to hold it together.

The reason for that is that the pillow has those little microbead things for stuffing.the inside of the pillow. So this is what I came up with.

I stuck one of my throw pillows in it just for picture purposes.


So cute!  Even if I do say so myself.

My friend asked me to make some Christmas ornaments for the grandparents of her children. She wanted handmade and we decided between us that I would try and do them in her nine year olds hand writing. So I sent the sliced pieces of Cedar home with her and let him write whatever he wanted on the ornaments for his grandmothers.

 Then I got out my Dremel and engraved the pieces of wood exactly the way he wrote on them. I then put shellac only in the grooved out portions i.e. the lettering, so that they would be shiny and kind of stand out a little bit from the rest of the piece. Her son saw them last night and simply adores them.  

Today I gave them a coat beeswax and used some jute to make bows on them where they can be hung, they can hang on a Christmas tree, or they could even hang on the wall. We're searching for some green ribbon because that's what he asked for but I thought that this would do in case we couldn't find any that he liked.

So here is a shot of those two ornaments…


We're also going to do a wall hanging for the new baby's arrival. As a Christmas present to her mother. 

We decided that we wanted to put the babies handprint,  or maybe footprints on the pace. So I got out a piece of Juniper and this morning we took some tempura paint, remember the baby is only two months old we had to be really careful about nothing toxic etc. etc. etc. they Didn't come out as black as I might have liked, they are more like a gray color but they're stinking cute. I think graphite will be perfect for drawing the rest of the peace, it will match that gray color beautifully.

Now I get to put the writing on the front that she asked for, but those pictures will come late.

I am also working on a very sculptural basket, my first actually. Yesterday I put some beads on it for peepholes and because they were glass they kept cutting my thread. I also found out the hard way that their coloring was a layer applied to the outside that would peel off. So this morning I got to get up and ripp out three hours of work.  Those beads simply are not acceptable.  

I am going to show you a couple pictures though and the beads are indeed still on it, they're gone now but I thought you might like how the piece is coming along.


If you look where the beads are you will notice that I would then go around over the top of them with the next row that's creating peepholes between each bead. That's not going to happen at least not with these beads at this point in time.

The peepholes would've looked something like the ones I did where the wooden inserts in the sides are…kind of like this…


So now I get to rethink that process. The inserts are a little larger than I would've liked, which makes the humps above them much taller than I really want.  I'll think of something though so stay tuned pictures will follow in a couple days or so.

Monday, December 15, 2014

12-15-2014

Okay girls and boys I'm trying something new.  Often I have seen baskets where they inserted other elements to change the shape of the basket  and for decorating the baskets. For instants sliced walnut shells.

Being one of those kind of people who like to swim upstream, as in I do not want to use walnut shells strictly because that's what everybody else is doing. I decided to put my own spin on things as I'm prone to do. 

It has taken me a couple years now to figure out how to make it work the way I wanted it to but this morning I dug out the pieces of wood I wanted to use in Liu of Walnut shells, and this is what I have accomplished so far…

We start with the base.  As you can see I'm already trying to figure out how to place that wood/Juniper slice.  Look closely and you'll notice that there is one standing up on the left side also.


Moving right along,  I didn't use the same technique that they advocate in the books I Kind of improvised it my own way. 

First I attach the wood by the bottom, and then on the next round went over the top of the wood. It was a little tricky because the wood wanted to flip and flop around a lot until I got around to putting a row along the top but I think it's going to be okay.


Since I don't usually do sculptural work, and I don't like holes in my baskets where things can fall out I decided to add in some beads to close the holes up a little.


This is all I have so far it's round is taking me almost an hour as this will be a large basket, or at least larger than I usually make.


Stay tuned girls and boys I'll post pictures as soon as I get a little further along.

Thursday, December 11, 2014

12/11/2014

Have been steady working on my art, especially since the transmission is out in my car. I have plenty of time on my hands…

So here's the tiny basket.


And on to other things. I have been thinking very hard about drawing a skull on a piece of wood, for selling of course.  Skulls are not typically my thing, I like happier art, but I thought I'd give it a shot anyway.  Especially since a friend of mine gifted me some reclaimed wood from the bookshelf.

It'll be great for practice as I do not want to risk ruining a piece of my cedar planking. So here's the first line drawing I came up with.


Be kind, and keep in mind that I am not going for realism. Just representational art. I kind of like the crooked eyes, but he doesn't look as mean as I would like for him to yet. 

I might even Zen tangle him, I'm just not sure what to do with it as yet.

And speaking of Cedar planking a friend (same friend that gifted me the reclaimed wood that the skull is on). of mine found a way to cut some of my slabs for me check it out…


They Measure approximately 13 in. X 9 in. And they were free!!! Even better!

I have also been working on a custom order for a friend of mine.  Christmas tree ornaments and a piece of wall art with her new baby girls feet prints and birth announcement on it for her grandma. I'm going to do that on a piece of cedar it should be beautiful, so keep watching we'll see what happens.

Monday, December 8, 2014

12/08/2014


Friday, November 21, 2014

11/21/2014

This week the wood won most of the time.

After my hands got all healed up, which took days and days, I finally decided to get outside on this beautiful sunny Florida day and work with some wood.

Before the cold weather came back, or rain of course, I decided to get outside. The first thing I did was sand, drill, burn my initials/put my on them, and oil 14 pieces of wood for the basket bottoms.

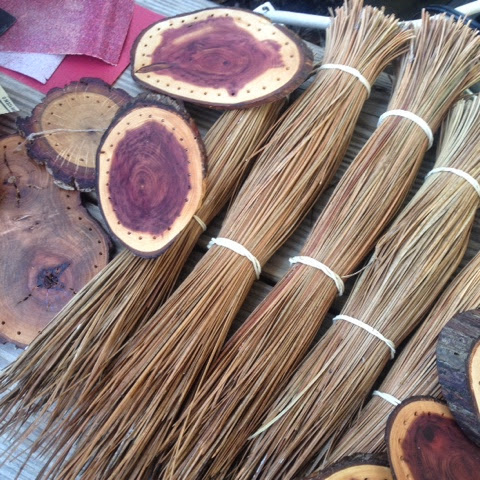
Of course I had to get the Pineneedles ready also… Here's a few shots.


And one small sayce spoon of Juniper.


I have two more rows and I will have completed a total of 4 baskets also this week.  

This one has Live Oak in the bottom.


I'll have to go to the amphitheater farmers market tomorrow just to get to sit and rest for a little while LOL. Talk to you guys soon.

Thursday, November 20, 2014

11/20/2014

I completed another tiny basket. 

Went with a little bit different shape than usual also. This one is yellow and fuschia.  It has a Live Oak Center.


Such a little cutie!

It looks like the sun is up so I think I'm going to go outside and do some woodwork wish me luck!   I still don't have quite as much consistency with the woodwork as I do with the baskets, kind of a crapshoot every time. Lol

Tuesday, November 18, 2014

Tuesday

Second day of the week and I already have three projects done.

Two baskets at one birthday present. 

Here's the second basket, it gets the "Wiggles" seal of approval.


Sunday, November 16, 2014

11/16/2014

One little tiny basket complete, getting  my work off to a good start already this week.


Live Oak center and glass beads with metallic finish.


Then I started another one, this one will be a lot bigger. I haven't been doing very many large pieces but I have one I'm going to send out for a spoon swap.  So I need another one to replace it on my table, here's the start. Stitched with green waxed linen with a Juniper center.