December 13, 2011
I am so bored, nothing creative is working AT ALL!!!!
UPDATE: Well some of it is working...sort of...the socks are coming along nicely, except I am bored with them. I have one heel turned and now for the next one. I promise to post pictures soon.
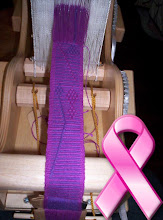
The shoulder injury gets a little less painful each day, Thank goodness, but the weaving still hurts me and sooooooo...I have picked up my pine needle basket weaving again! This I can do sitting in my recliner with very little physical pain.
I went to Jacksonville to spend a day or so with my friend Max and took my newly started basket with me. I weaseled her into taking me to look for pine needles too. We actually found some fallen branches and so the gathering was actually pretty easy. ALOT easier than picking them up one at a time from the ground for sure.
Then as we sat amiably, she beading and me coiling my pine needles, I wondered aloud who would like a basket made of green stitches. Of course she said "I would" and it began.
She bought a couple of my baskets in the past, and I didn't realize that she liked them that much. hmmmmm!!! So in the course of the conversation we decided on a centerpiece, maybe like a fruit bowl. It would have an 8" base and it went from there.
So I have taken a few pictures for you.
It starts of with pine branch slice and myrtle green #10 mercerized cotton crochet thread (I already had it on hand). Later I will be adding in some Royal blue. Here is a peek.
First de-capped pine needles. These are shorter pine needles than the ones I used to get in GA. But they work o.k. These are ready to go. I am using them dry as they didn't need to bend overly far to accommodate the pine limb slice, my friend Buzzy did the slices and the holes for me.

Here you get to see the entire set up. One container for the pine needles themselves...this is because there are times when they have to be damp. The other is for things like my needles, thread, scissors and such.
A little tip for any of you who are going to do pine needle basket coiling. As you stitch, you have to tug the stitches nice and firmly tight, or you will have a soft/sloppy basket. In doing so you hands tend to get sore, sometimes the thread will cut you, and of course the needles do poke you at times. Both can be quite painful.
I discovered when I did coiling the last time that gloves can be very difficult to work in, so the hunt was on. I couldn't find anything that worked like I wanted it to and let me still feel what I was doing. So I improvised, I got a pair of 'Playtex' cleaning gloves and cut off the long arm part, and the tips of the fingers. WALA! Perfect! I can feel what I am doing, the gloves don't slip (I actually found them in size small for my LEETLE hands) they protect beautifully, they are reasonably priced, and easily found. Can't beat that right! I don't have pictures for this post, but will have some up for you of the glove very soon.
I am not sure if you remember, but I actually made the pin cushion also. It is steel wool covered with burlap and placed in an old cheese tin. Large and tough and stable!

Here I am at almost 8" and I am started off with double strands of thread, one blue and one green. I found that I kept popping/breaking the single stranded green. #10 is a little to fine I guess, even though I have used it successfully in the past. I do run it along an old piece of vanilla scented candle wax to help with this. I also have some nylon and hemp to try for the next basket.
I have used #3 also and I definitely like it better than the #10. If I am going to work so hard to make nice neat evenly spaced stitches I want them to show a little more than these do. ;-}

And here you can see I have started the side walls...you may even be able to see the royal blue in with the green.


It is now 8 1/2 in. wide and 1 1/2 in. tall.


So this is what I am up to for now folks. Stay tuned, as the basket progresses I will post pics, and I will definitely be finishing the socks. Especially since the first one fits so well.


+watermark.jpg)
+watermark.jpg)
+Watermark.jpg)
+watermark.jpg)


No comments:
Post a Comment