Did you know?

A "Pandula" is a flower which blooms only in one's imagination.

Pages

Showing posts with label Coiled Pine Needle basket. Show all posts

Monday, April 30, 2012

Pine Needle Basket coming right along.

April 6, 2011

I went to the Green Cove Springs, FL, Clay County Fair yesterday.  I went with my friend Max and her daughter to do demonstrations.  They did bead weaving and I did Pine Needle basket coiling.  A fun time was had by all and I was pleasantly surprised to find so many people interested in the basket work.  Unfortunately I didn't think to take my camera...

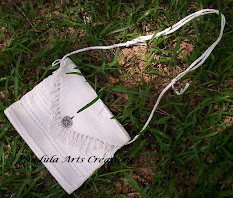
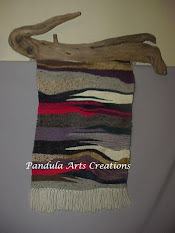
I took several examples of my work.  Two that I made last year or so, the red and black one and the one I did with copper wire and Ivy vine.  Max brought along 3 pieces that I had done for her and her family.  The 'fruit bowl' blue and green, the little purple and blue one I made for her daughter and my only waxed piece a trivet.

I took examples of different types of Pine needles, I even collected some the day before on a nice long bicycle ride.  I also took my books and lots of different center pieces along with examples of threads and cards in case anyone wanted to find me.

The weather was gorgeous and I took my 'triangle basket' to work on.  So I thought you might like to see what I have so far.

This shot is from the top. The green stripe is some grass my room mate pulled for me.  I believe it is Muly grass, also know as sweet grass.


Here it is from an angle so that you can see how deep it is so far.  It is a little over 2 in. and I am shooting for 3...I think.  I have incorporated green Long Leaf Pine needle's that Dana sent me from Georgia.  Wish I had some more.


This one is the bottom so you can see how much my stitching has improved.  :-))))


As you can see it is around 9 in. at it's widest.


I have another center like this one with the holes already drilled.  My intentions, always subject to modification ya know, is to make another just like it, only a little bit larger diameter.  Then I will turn it upside down and place it over this one and it will serve as a top.  That way I have to independent baskets or one with a nice tight lid.  We'll see how it goes.

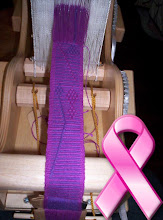
I am using waxed linen on this one and I must tell you it is much easier to work with than the unwaxed threads, even when I drag them over the was they are not as nice as this is.  Unfortunately this is the only color I can get her locally and I am getting a bit tired of brown.  It also comes in very small pkgs.  20 yards for $1.99 at Hobby Lobby, I am already on the 4th pkg at this point.  I may have to break down and order some from off line.  I am just not sure whether I want to order alot in the same color or lots of colors????

Decisions, decisions, decisions.

Wednesday, April 4, 2012

Pine needle basket weaving/coiling.

March 29, 2011

I haven’t been doing much in the way of weaving here lately. But I do keep plugging away at my Pine basket work.

This one is for me. I am going to make myself a basket for my ‘basket tools’. The center is Oak and I have tried some of the local grasses…the green part that you see. I think it is Muly grass, also known as sweetgrass. It measures 9 1/2 in. x 8 1/4 in. so far. Of course I have my quality control personnel on duty also.


I have another piece of this same wood and I may even try my hand at a lid for this basket...I am just not sure I can get the shapes to match up even though the centers are roughly the same size and shape...we'll see!


Monday, March 26, 2012

Completed Pine basket.

March 6, 2012
 
I have completed the first of the two commissioned Pine needle baskets.  I was asked to duplicate the one I did for my sister...you know, the one I forgot to take pictures of before I gifted it to her.

So here is a picture of what it looked like, for the most part.  The center is Pine branch slice like hers, but the wrapped coil was the absolute first coil done.  I couldn't get it to work this time, so after days of effort and frustration, I just did a couple of rows of stitch work and then wrapped.

The russet is #10 mercerized cotton crochet thread double stranded and the dark brown is waxed linen.  I used closed coil wrapping, the v stitch and the fern stitch.  It has a 7 in. base and 2 in. tall sidewalls.

I absolutely love working with the waxed linen.  It is really too bad I can only find it in dark brown here in St. Augustine.  Even then I found it at the local Hobby Lobby, and as we all know I work at Michaels.  lol  None to be had there although we do have the artificial sinew aplenty.

Pics...From the top.


From the side...

From the bottom, believe it or not my signature and the date is signed on the back.  So sorry for the glare.  I wax the wooden center's and I couldn't get any better shot than this.  In this next one I also think you can see some of the green needles I like to incorporate.  I dry them in the house so that they retain their color.  I am told that with time they will turn brown, but kept out of direct sunlight the green lasts a very long time.


Still one more to go.  I think I might reverse the color of the threads next time.  Dark brown for the body and russet for the trim.  (I am a bit bored with these colors in general, I think this is the 5th basket using russet as my base color.  I am indeed looking forward to using another color when these two baskets are completed.)  The center will probably be Cedar.  Stay tuned folks, same bat time, same bat channel.  LOL

Monday, March 19, 2012

Finally! Weaving!!!!

 February 22, 2012

I finally finished my piece that has been on the loom bars since before the car accident in November.  And I have also warped up a piece for dbl wft dbl wf (embedded double weave).

Here is the simple warp float piece from November.  I just had no inspiration at all and wanted to see if I could manage to weave with the injury to the shoulder.  However, I do love simple warp floats and the colors here just pop against one another.  I did do something new and leave the stripes inside the motif, and warp floats galore on the outside.  Just simple diamond's but good practice.  All in all I am pleased.


 It will be made into an envelope bag.  Here I did a test run of the folding.


The dbl wv is in bright white and charcoal gray...so far I have only done my signature heart as I have two commissions for pine needle baskets I had to get a start on.  No pics of those in the other thread as they will be as close to the first one that the lady saw as possible.  Boring, but money is money, I am glad for the work at all.

As for this weaving, I have 19 pattern threads (after creating border's that hide the weft well) and am trying to decide on whether to do something of my own in motif or maybe some Bedouin motif's from Laverne's charts.

Yesterday I got a wonderful couple of phone calls from Georgia.  I sent my socks that were a little too big for me to my friend Dana, you remember the two tone blue and teal ones done not long ago, and I sent her fella Steve a Pine needle basket.  Both were well appreciated and I feel good to have been able to do something nice for my friend's.

All in all a good day!


Wednesday, March 14, 2012

Closed coiling on Pine Needle basket.

January 23, 2011

I have decided to make myself a basket for my Pine needle coiling tools.  It will be on the large side, made with both FL and GA pine needles.  I have a very nice Pine slice for the center and I am experimenting with various threads.  

I am going to attempt to make holes along the top rim for sliding my scissors, pliers and such into.  I am thinking of making a small pin cushion and mounting it onto the basket somehow also.  This basket will be larger than my previous creations and I think it should have a lid/top and handle.  

So far I have tried polished hemp in deep dark brown, hated it, drags too much to make traditional stitches no matter what I slick it up with.  I have tried paraffin, soy wax and even thread heaven, NOTHING MAKES IT WORKABLE.  :-(  I did accomplish some wrapping with it, but I have no desire to try to work with it again  with Pine needle work, so this would be the only spot of it...not much for help for the design factor, so I will probably redo this basket start...again...already done it several times.  I also discovered that the wrapping, since it completely covers the 'core'(i.e. pine needles) takes much more time than the already time consuming stitching....bummer.  I also like being able to see the pine needles...so I switched to the v stitch in my faithful #10 double threaded Russett (while I love the color I am a bit tired of it since I have been using it so much, bummer again).  Then I went back to the coiling in #3 Copper Mist. 

My thoughts were, dark brown, medium brown, light brown.  Not looking like it did in my head and I can't make up my mind if I even like it.  Notice that the anchor stitch of the copper mist wrapping, goes down into the Russet...don't like that at all.

I am posting a picture, but it may vanish after today.  I put it aside for a couple of days and I don't like it any better today than I did when I put it down.


Feb 16, 2012 update!


Took this apart and re-worked the entire thing.  It turned out beautiful, but I have gifted it to my baby sister and not only did I forget to take pictures, I forgot to sign the back :-( !  But she loved it and I have started another.

Wednesday, March 7, 2012

Steve's basket and some new books.

January 18, 2012

Started a new basket 2 days ago.  This one will be for my friend Dana's fella, a place for him to empty out his pockets when he comes home at night.

His favorite color is green and I used a Poplar center.  Here is what I have so far.


I have the best, most supportive friend's in the world.  Last week I got pine straw in the mail from Georgia, this week I got two basket weaving books from Max in Jacksonville.  I love you guys.


Both books are very informative.  The one on the right is superb for letting me know what to harvest from my surroundings to continue my basket experimenting.

I also went out and cut my first bamboo for playing around with.  I had no idea it would be so tough while so thin and tiny.  I also had no idea it would be yellow.


So now I have Georgia Long leaf pine needles, Florida pine needles, split leaf philodendron sheath harvested from the yard, sliced pine and poplar buttons for starter points, bamboo (don't you just love the little knobs!) and palm frond.  I am on the look out for Muly grass (aka Sweet grass ).  Look out boys and girls!  Here she comes.

Wednesday, February 29, 2012

Pine needle basket weaving/coiling.

January 18, 2012

I thought I would just throw out some of my experience's on the learning curve of Pine needle basket weaving.

One of the things I think needs clarification is the name "Pine Needle Basket Weaving".  Notice how I always place the word 'coiling' after 'weaving', the reason for this is that there is no actual WEAVING going on here.  I can't even imagine how it got that name.  

In reality it is coiling and stitching, more akin to sewing than anything else...maybe embroidery and cross stitch as the stitches are decorative. This is why I always differentiate this title.  I have only seen one book that clarifies that this is not weaving, there is no over and under, only stitching and feeding more pine needles into the coil.  The method is actually very simplistic, the rest is all design element.  That is why the resulting basket is so very personally related to the person constructing it.  This is also in all probability why I love it so very much.

The tools are minimal, and are usually already on hand, especially if you are artsie fartsie (crafty) at all.

You need pine needles (I collect them myself and use rubber bands to bundle them with all of the heads at the same end), of course, a needle, and thread (or even raffia)at a minimum.  Some people dampen the pine needles to start with, and then wrap them in a towel to keep them moist.  A couple of times mine molded, and so I don't dampen them any more.  I us center's for most of my baskets that are large enough that I don't need the pine needle to bend to the point that it cracks or breaks.  I also find that I get a firmer basket if I use them dry.

I also use a gauge (a piece of cut ink pen tube, sometimes a piece of a drinking straw), a pin cushion, a small pair of pliers, scissors, wax or thread heaven, something for trash, a container for my tools  (glad ware, wicker basket or tool box even), a container for the pine needles (glad-ware again), a thimble (I keep a medal one and leather one on hand), a glove for my right hand (Playtex cleaning glove with the fingers cut off at the tip, when tightening up the stitches it is easy to cut yourself, like a paper cut, with the thread without this glove) .

So here are a few pictures to help clarify.

First off, my friend Dana sent me some Long Leaf Pine needles from Georgia.  I knew the ones I have found here in FL so far were smaller but ... OMG.  Check it out.  Not only are they longer but the difference in thickness is incredible.  The Long Leaf are heavier, say a #3 crochet thread size, and the ones I gather here are more like a #10 thread size.  Amazing.

They both work equally well, I just have to feed more pine needles in more often with the smaller ones.  Mine are somewhere between 8 to 10 in long, and the Long leaf between 14 and 16 in. long.  God love Dana for send them, and I hope to receive more.  They are expensive to buy by the way.


So here I will post a pic of some of my tools.  This is part of the left hand glove that would have been discarded.  This way I don't waste it and I can double up on thickness.  These are the fingers that get the most cuts from the threads.

This is the second layer of glove.


Home made pin cushion (steel wool wrapped with burlap in an old cheese tin), plyers, wax, thimble, scissors, #10 thread (I double it because it breaks when I don't) and a started basket.  Notice the gauge and the sliced Poplar center.  I had a friend cut and drill these for me months ago so that they could cure.  I don't care for the poplar as I see no grain, live and learn.


Glad-ware with de-capped needles ready to go.  Some were picked green and dried indoors to retain their green color.  Eventually they were brown up just as the others that were dried outside will do.  I think I recall reading that if you Shellac or varnish the basket they colors stays green...but I like the Pine scent so the most I have done is spray a little matte fixative on a basket.  I find I like my method of waxing the thread and then melting it in the microwave is more to my liking.  Makes the house smell wonderful also.


I save and use tins alot.  The round one holds my rubber bands, one has needles, one has wax.  You get the idea.  And then we see the gauge at work, this one is an ink pen tube cut to size.


And that, my friends, is my way of making pine needle baskets.

I have taken to walking my dogs in the afternoons to scour out supplies, and low and behold yesterday I found a small stand of bamboo.  The lady who owns the property says have at it, so today I cut some small bamboo to work into this process.  I am also going to add in some palm frond and vines...so stay tuned.

Same bat time, same bat channel.

Oh yes, and we can't forget the cutest pup ever has to supervise.  She is on the heating pad AND under a blanket.  You would think we lived in the Arctic instead of FL.  lol


Wednesday, February 22, 2012

Basket for a 'tween.

January 14, 2012

I decided to see if I could do a small basket.  I also decided to try and make a pre-determined shape.  Often in my art I let the materials lead me...that is why the last basket has sides that slope outwards.  I was really thinking along the lines of a basket with C shaped sides when I started it.

This time I got the shape I wanted.  It is 5 1/2 in. at it's widest, and 1 1/2 in. deep.  I used blue and purple because I happen to know a 12 yr. old that loves these colors together.  I made her the little Peace sign envelope bag if you remember.  To my great pleasure she carries it every day.

She got a new desk for her bedroom for Christmas and I thought she might like a little basket for things like paperclips, rubber bands or whatever.  So without further ado...the 'tween' basket for Aye.

Isn't it cute!  I used a wrapped pine needle center, not an easy thing to do, so I wanted the practice.  The blue stitches are the V stitch and the dark purple stitches are the Fern stitch.

When completed I rubbed a piece of candle wax on the stitches (they are also rubbed with wax as I stitch) and then popped it into the microwave for about 45 seconds to melt the wax.  This gives it a nice firm feel, even though it was very firm with just the stitches, and it doesn't mask the pine scent I love so much the way waxing the entire basket does.

I thought of adding some embellishments, like beads, but then decided that it stands well on its own merit.  

I think she's gonna to like it.  :-)


 Here you see the side shaping. 


EDIT:  Feb, 7, 2011 (approx. date), the basket has been present and is duly loved!  It sits proudly on the new desk in her room.

Wednesday, February 15, 2012

Another Pine needle basket!

January 11, 2011

This one only took me 3 days.  

The center is my own hand cut and hand drilled slice of an Aspen tree branch.  It is an odd center, it is totally white, I see absolutely no grain to the wood, strange.  The base is 6 in. across and it flares to 8 in. total.  I used Russet #10 mercerized cotton thread doubled, and Copper mist #3 mercerized cotton single strand, for the threads.  I drag each piece of thread repeatedly across a piece of wax before threading and sewing.  (I use cotton because I have it in abundance.)  I used a random mix of green and brown pine needles.  The ones that are green were dried in the dark under my bed to preserve their color.  They will, of course eventually turn brown very slowly (especially if direct sunlight is avoided).  

I used the V stitch for most of the body, and for the first time the Fern stitch as a trim and decoration.  I concentrated on technique and consistency of the stitches.  Both of these stitches were chose because I wanted a very firm basket.  It seems the more legs on the stitches the firmer the basket. 

 I wrapped the little handles also.  When the basket was complete I popped it into the microwave for 45 seconds to melt the wax off of the thread as it tends to look chalky if I don't.  It was just enough wax to make this basket hold its form without any kind of wobble or sloppiness at all.

I have not done any baskets in almost a year, so these two have been like relearning the techniques.  I have very nice tools and such in storage, but had to use what was on hand as I couldn't get to them.  I always just try to keep in mind that most of the arts/crafts we do today, were originally done hundreds of years ago without the modern conveniences we have access to.

Even though I absolutely love the blue and green basket, this one is probably my best to date.  The stitches are remarkably symmetrical (very difficult for me as I am certainly no seamstress) and very firm.  

I am keeping this one!  I am even thinking of somehow incorporating a small pin cushion into it.


A little update...this one was gifted to Kraftymax's hubby for his birthday.  I think they make great places for anyone to empty out their pockets at the end of the day.  He seemed adequately impressed with the fact that it is made from pine needles.  Happy Birthday Daddy K.

Monday, June 7, 2010

Newest Coiled Pine Needle Basket