Did you know?

A "Pandula" is a flower which blooms only in one's imagination.

Pages

Showing posts with label #3 cotton crochet thread. Show all posts

Wednesday, March 14, 2012

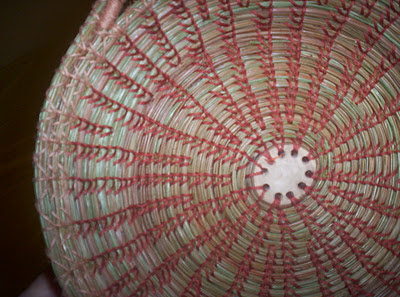
Closed coiling on Pine Needle basket.

January 23, 2011

I have decided to make myself a basket for my Pine needle coiling tools.  It will be on the large side, made with both FL and GA pine needles.  I have a very nice Pine slice for the center and I am experimenting with various threads.  

I am going to attempt to make holes along the top rim for sliding my scissors, pliers and such into.  I am thinking of making a small pin cushion and mounting it onto the basket somehow also.  This basket will be larger than my previous creations and I think it should have a lid/top and handle.  

So far I have tried polished hemp in deep dark brown, hated it, drags too much to make traditional stitches no matter what I slick it up with.  I have tried paraffin, soy wax and even thread heaven, NOTHING MAKES IT WORKABLE.  :-(  I did accomplish some wrapping with it, but I have no desire to try to work with it again  with Pine needle work, so this would be the only spot of it...not much for help for the design factor, so I will probably redo this basket start...again...already done it several times.  I also discovered that the wrapping, since it completely covers the 'core'(i.e. pine needles) takes much more time than the already time consuming stitching....bummer.  I also like being able to see the pine needles...so I switched to the v stitch in my faithful #10 double threaded Russett (while I love the color I am a bit tired of it since I have been using it so much, bummer again).  Then I went back to the coiling in #3 Copper Mist. 

My thoughts were, dark brown, medium brown, light brown.  Not looking like it did in my head and I can't make up my mind if I even like it.  Notice that the anchor stitch of the copper mist wrapping, goes down into the Russet...don't like that at all.

I am posting a picture, but it may vanish after today.  I put it aside for a couple of days and I don't like it any better today than I did when I put it down.


Feb 16, 2012 update!


Took this apart and re-worked the entire thing.  It turned out beautiful, but I have gifted it to my baby sister and not only did I forget to take pictures, I forgot to sign the back :-( !  But she loved it and I have started another.

Wednesday, February 29, 2012

Pine needle basket weaving/coiling.

January 18, 2012

I thought I would just throw out some of my experience's on the learning curve of Pine needle basket weaving.

One of the things I think needs clarification is the name "Pine Needle Basket Weaving".  Notice how I always place the word 'coiling' after 'weaving', the reason for this is that there is no actual WEAVING going on here.  I can't even imagine how it got that name.  

In reality it is coiling and stitching, more akin to sewing than anything else...maybe embroidery and cross stitch as the stitches are decorative. This is why I always differentiate this title.  I have only seen one book that clarifies that this is not weaving, there is no over and under, only stitching and feeding more pine needles into the coil.  The method is actually very simplistic, the rest is all design element.  That is why the resulting basket is so very personally related to the person constructing it.  This is also in all probability why I love it so very much.

The tools are minimal, and are usually already on hand, especially if you are artsie fartsie (crafty) at all.

You need pine needles (I collect them myself and use rubber bands to bundle them with all of the heads at the same end), of course, a needle, and thread (or even raffia)at a minimum.  Some people dampen the pine needles to start with, and then wrap them in a towel to keep them moist.  A couple of times mine molded, and so I don't dampen them any more.  I us center's for most of my baskets that are large enough that I don't need the pine needle to bend to the point that it cracks or breaks.  I also find that I get a firmer basket if I use them dry.

I also use a gauge (a piece of cut ink pen tube, sometimes a piece of a drinking straw), a pin cushion, a small pair of pliers, scissors, wax or thread heaven, something for trash, a container for my tools  (glad ware, wicker basket or tool box even), a container for the pine needles (glad-ware again), a thimble (I keep a medal one and leather one on hand), a glove for my right hand (Playtex cleaning glove with the fingers cut off at the tip, when tightening up the stitches it is easy to cut yourself, like a paper cut, with the thread without this glove) .

So here are a few pictures to help clarify.

First off, my friend Dana sent me some Long Leaf Pine needles from Georgia.  I knew the ones I have found here in FL so far were smaller but ... OMG.  Check it out.  Not only are they longer but the difference in thickness is incredible.  The Long Leaf are heavier, say a #3 crochet thread size, and the ones I gather here are more like a #10 thread size.  Amazing.

They both work equally well, I just have to feed more pine needles in more often with the smaller ones.  Mine are somewhere between 8 to 10 in long, and the Long leaf between 14 and 16 in. long.  God love Dana for send them, and I hope to receive more.  They are expensive to buy by the way.


So here I will post a pic of some of my tools.  This is part of the left hand glove that would have been discarded.  This way I don't waste it and I can double up on thickness.  These are the fingers that get the most cuts from the threads.

This is the second layer of glove.


Home made pin cushion (steel wool wrapped with burlap in an old cheese tin), plyers, wax, thimble, scissors, #10 thread (I double it because it breaks when I don't) and a started basket.  Notice the gauge and the sliced Poplar center.  I had a friend cut and drill these for me months ago so that they could cure.  I don't care for the poplar as I see no grain, live and learn.


Glad-ware with de-capped needles ready to go.  Some were picked green and dried indoors to retain their green color.  Eventually they were brown up just as the others that were dried outside will do.  I think I recall reading that if you Shellac or varnish the basket they colors stays green...but I like the Pine scent so the most I have done is spray a little matte fixative on a basket.  I find I like my method of waxing the thread and then melting it in the microwave is more to my liking.  Makes the house smell wonderful also.


I save and use tins alot.  The round one holds my rubber bands, one has needles, one has wax.  You get the idea.  And then we see the gauge at work, this one is an ink pen tube cut to size.


And that, my friends, is my way of making pine needle baskets.

I have taken to walking my dogs in the afternoons to scour out supplies, and low and behold yesterday I found a small stand of bamboo.  The lady who owns the property says have at it, so today I cut some small bamboo to work into this process.  I am also going to add in some palm frond and vines...so stay tuned.

Same bat time, same bat channel.

Oh yes, and we can't forget the cutest pup ever has to supervise.  She is on the heating pad AND under a blanket.  You would think we lived in the Arctic instead of FL.  lol


Wednesday, February 15, 2012

Another Pine needle basket!

January 11, 2011

This one only took me 3 days.  

The center is my own hand cut and hand drilled slice of an Aspen tree branch.  It is an odd center, it is totally white, I see absolutely no grain to the wood, strange.  The base is 6 in. across and it flares to 8 in. total.  I used Russet #10 mercerized cotton thread doubled, and Copper mist #3 mercerized cotton single strand, for the threads.  I drag each piece of thread repeatedly across a piece of wax before threading and sewing.  (I use cotton because I have it in abundance.)  I used a random mix of green and brown pine needles.  The ones that are green were dried in the dark under my bed to preserve their color.  They will, of course eventually turn brown very slowly (especially if direct sunlight is avoided).  

I used the V stitch for most of the body, and for the first time the Fern stitch as a trim and decoration.  I concentrated on technique and consistency of the stitches.  Both of these stitches were chose because I wanted a very firm basket.  It seems the more legs on the stitches the firmer the basket. 

 I wrapped the little handles also.  When the basket was complete I popped it into the microwave for 45 seconds to melt the wax off of the thread as it tends to look chalky if I don't.  It was just enough wax to make this basket hold its form without any kind of wobble or sloppiness at all.

I have not done any baskets in almost a year, so these two have been like relearning the techniques.  I have very nice tools and such in storage, but had to use what was on hand as I couldn't get to them.  I always just try to keep in mind that most of the arts/crafts we do today, were originally done hundreds of years ago without the modern conveniences we have access to.

Even though I absolutely love the blue and green basket, this one is probably my best to date.  The stitches are remarkably symmetrical (very difficult for me as I am certainly no seamstress) and very firm.  

I am keeping this one!  I am even thinking of somehow incorporating a small pin cushion into it.


A little update...this one was gifted to Kraftymax's hubby for his birthday.  I think they make great places for anyone to empty out their pockets at the end of the day.  He seemed adequately impressed with the fact that it is made from pine needles.  Happy Birthday Daddy K.

Wednesday, January 18, 2012

Purple and blue, brown and yellow!

January 15, 2012

Just a shot of a couple of more pieces that were done over the course of my healing (in December).  The yellow and brown one was done on the pvc pipe loom, and I forgot to take pics while in the process.  Here is a shot of the loom with the bell pull piece on it, in case you haven't seen it.


It is rather labor intensive, in that I make a backstrap warp, mount it onto the loom bars and then wrap them around this frame and lash them together.  If you look closely you can see the wooden loom bars up near the top (I am almost done with this piece in this pic).  You can also see the threaded rods inserted into the pvc side bars for tensioning.  Works great! Rotating the warp when I can no longer find enough space to weave is a bit of a pain, but since this shot I have worked on that problem also.

But as usual, I digress.


Here is the brown and yellow piece I did on the same loom.  The yellow is called Maize and it is #3 mercerized cotton crochet thread, and the brown is #10 in Russet.  I love these colors together.


I see a day of sewing in the near future!


This one was done on the backstrap and gave me fits.  I had a really hard time winding warp with a bum shoulder.  It will probably just be a table runner.  Too wide for an envelope pouch, but might work as just a tri fold ....we'll see when I break out the sewing machine.


Wednesday, November 30, 2011

Northwest Inkle Looms

November 22, 2011

Today is the first day of starting up my blog again after my car accident and short hiatus.  I will be posting on Wednesday's only for a little while, with maybe a few scattered in between as I feel the need.

To start with, I think you all know that I have recently been forced to move for the second time in 3 mnths.  It really sucked, but I am no pretty much getting settled in...again.  However, per usual, I was having an extremely difficult time figuring out where to hook up my backstrap.  The room I am in is extremely small this time and this was making me very sure my trash picked weaving table wasn't going to fit.

So I decided to try out an Inkle loom and see if this would eliminate this problem from here on out.  I went on line and did some research.  I decided I wanted a full size loom, not an inklette.  I also decided I wanted one with two sides, one of which would be removable for warping.  This research lead me to a site for the Northwest Loom company in Wyoming.  Beautiful handcrafted looms very reasonably priced.  So I went ahead and ordered one.

There was a little confusion on delivery, since I was new to the neighborhood, through no particular person's fault, but it came to me the day after I got into the car accident.  It is/was a beautiful piece with a free belt shuttle as well.  Oak is my favorite wood and it was crafted beautifully. 

I have been in a sling, but did manage to warp it up with my roommate's help for a set of shoe string's for her.  Home Depot orange, ecru and gold (I still have to get aglets for the ends).  Very narrow, plain weave.  The loom was about 34" long though, making it necessary to have a table at the far end to rest it on.  I had thought I would rest it on the floor at the other end from me, thus no need for another table.  I have seen others do Inkle weaving this way, but for me it was a uncomfortable, and it had nothing to do with the car accident, it just felt awkward.

So in rearranging the furniture in my room for the 15th time I finally hit on an arrangement that allowed my weaving table to come into the room.  OMG, what a homecoming.  It was like slipping on my favorite slouch clothes when I sat up to that backstrap loom.  I knew in that moment that Inkle weaving was not for me.  No matter how lovely the loom.  So it has been returned to Wyoming with my most sincere regrets to Mr. Tony.

I put on a practice warp for the backstrap, a little red and green piece for the Facebook Color Challenge group and started up  (more about the actual weaving soon).  Now to get rid of the bulky and ugly tool box.  There is a drawer in my trash picked table...so I brainstormed and came up with what I now call a "Weaving Station".  I laid a handwoven piece in the bottom of the drawer and placed all of my necessary tools in the drawer.  Everything from a mirror for double weave, to my notebook.  Then I took a Russell Stover candy tin my friend Max gave me and put the tools necessary for the actual weaving, pulled my computer chair u next to the recliner as a table, and placed the tin there.  PERFECT!

First we see the tin with the immediately needed tools ready at the hand next to me.  They are sitting on the computer chair which of course has wheels and I can position anyplace needed with one hand.


Here you can see the drawer with my other tools in it.  You can also see the backstrap loom, it is behind the c clamps.


Love this!  I need to trash pick more often.  My roommate and I are even thinking about painting the table with acrylic pain, maybe a woods scene.


And here you can see it being used! 


So for now I am set up again...until another (God forbid) move.  Can't weave for more than a few minutes at this point, because of my shoulder.  The car was t boned on my door.  So the right arm (I was a passenger) is very sore, we removed the staples on Saturday the 20, boy am I glad those things are out.  But I still have alot of pain due to the separation in the shoulder, but hopefully I will be o.k. in the long run.  

Stay tuned friends and I will be letting you know how this little Christmas band turns out.  

I hope everyone had a wonderful Thanksgiving!

Wednesday, November 9, 2011

Crochet

Sunday, November 6, 2011

Planning an day outdoors today.  Going to meet a new friend and go motorcycle riding.  We have been having some great weather here of late, should be loads of fun.  We will be heading to Fernandina Beach by way of the scenic route.  Maybe even go across the Mayport ferry in Jacksonville.

Crochet blanket is about all that is being worked on at this point. I am still deciding on what to do for my first project on the Inkle.  Might be shoelaces so that I can get the hang of the loom.  But keep in mind that I also have some hand spun yarns that need to be used.  My Fall wool and tons of cotton.  Still gotta ply both though...

Friday, October 7, 2011

Houston, I adore these skulls!

August 6, 2011

I think Monster, my friend Max's six yr. old son, is gonna love these!  I know I do!

I have been playing around with the design and I like the first one the best and the middle one the least.  I am going to try to turn this into a pouch of some sort for him...maybe even a shealth for his Thor's hammer's handle, or a sword, perhaps a gun?  Who knows what it will grow up to be since it is so totally off the mark from what I started out to do.  

The original plan was to do a little pouch for sliding on to his pants belt.  Maybe for coins or marbles and such.  But as it is going to be so thick from side edge to side edge I am not sure.  Maybe it will be a pencil case.  By placing the skulls upwards and downwards both I think that there will be no wrong side or right side so which ever I decide it should be o.k. 

He has the skull drawing I did for him (see previous posts) hanging on his bedroom door.  His mom framed it out with duct tape that also has skulls on it.  Wayyyyy cute!

I did my first attempt at acrylic painting for him also.  That one is Captain America's shield.  Let's just say that painting is not my best thing.  However, it has the dignified spot on the wall just above his desk in his room.  How cool is that.  I have hit one something a boy can like.  Good thing there are lots of action heroes!