Did you know?

A "Pandula" is a flower which blooms only in one's imagination.

Pages

Showing posts with label 100% mercerized cotton crochet thread #10. Show all posts

Monday, March 26, 2012

Completed Pine basket.

March 6, 2012
 
I have completed the first of the two commissioned Pine needle baskets.  I was asked to duplicate the one I did for my sister...you know, the one I forgot to take pictures of before I gifted it to her.

So here is a picture of what it looked like, for the most part.  The center is Pine branch slice like hers, but the wrapped coil was the absolute first coil done.  I couldn't get it to work this time, so after days of effort and frustration, I just did a couple of rows of stitch work and then wrapped.

The russet is #10 mercerized cotton crochet thread double stranded and the dark brown is waxed linen.  I used closed coil wrapping, the v stitch and the fern stitch.  It has a 7 in. base and 2 in. tall sidewalls.

I absolutely love working with the waxed linen.  It is really too bad I can only find it in dark brown here in St. Augustine.  Even then I found it at the local Hobby Lobby, and as we all know I work at Michaels.  lol  None to be had there although we do have the artificial sinew aplenty.

Pics...From the top.


From the side...

From the bottom, believe it or not my signature and the date is signed on the back.  So sorry for the glare.  I wax the wooden center's and I couldn't get any better shot than this.  In this next one I also think you can see some of the green needles I like to incorporate.  I dry them in the house so that they retain their color.  I am told that with time they will turn brown, but kept out of direct sunlight the green lasts a very long time.


Still one more to go.  I think I might reverse the color of the threads next time.  Dark brown for the body and russet for the trim.  (I am a bit bored with these colors in general, I think this is the 5th basket using russet as my base color.  I am indeed looking forward to using another color when these two baskets are completed.)  The center will probably be Cedar.  Stay tuned folks, same bat time, same bat channel.  LOL

Wednesday, March 14, 2012

Closed coiling on Pine Needle basket.

January 23, 2011

I have decided to make myself a basket for my Pine needle coiling tools.  It will be on the large side, made with both FL and GA pine needles.  I have a very nice Pine slice for the center and I am experimenting with various threads.  

I am going to attempt to make holes along the top rim for sliding my scissors, pliers and such into.  I am thinking of making a small pin cushion and mounting it onto the basket somehow also.  This basket will be larger than my previous creations and I think it should have a lid/top and handle.  

So far I have tried polished hemp in deep dark brown, hated it, drags too much to make traditional stitches no matter what I slick it up with.  I have tried paraffin, soy wax and even thread heaven, NOTHING MAKES IT WORKABLE.  :-(  I did accomplish some wrapping with it, but I have no desire to try to work with it again  with Pine needle work, so this would be the only spot of it...not much for help for the design factor, so I will probably redo this basket start...again...already done it several times.  I also discovered that the wrapping, since it completely covers the 'core'(i.e. pine needles) takes much more time than the already time consuming stitching....bummer.  I also like being able to see the pine needles...so I switched to the v stitch in my faithful #10 double threaded Russett (while I love the color I am a bit tired of it since I have been using it so much, bummer again).  Then I went back to the coiling in #3 Copper Mist. 

My thoughts were, dark brown, medium brown, light brown.  Not looking like it did in my head and I can't make up my mind if I even like it.  Notice that the anchor stitch of the copper mist wrapping, goes down into the Russet...don't like that at all.

I am posting a picture, but it may vanish after today.  I put it aside for a couple of days and I don't like it any better today than I did when I put it down.


Feb 16, 2012 update!


Took this apart and re-worked the entire thing.  It turned out beautiful, but I have gifted it to my baby sister and not only did I forget to take pictures, I forgot to sign the back :-( !  But she loved it and I have started another.

Wednesday, February 15, 2012

Another Pine needle basket!

January 11, 2011

This one only took me 3 days.  

The center is my own hand cut and hand drilled slice of an Aspen tree branch.  It is an odd center, it is totally white, I see absolutely no grain to the wood, strange.  The base is 6 in. across and it flares to 8 in. total.  I used Russet #10 mercerized cotton thread doubled, and Copper mist #3 mercerized cotton single strand, for the threads.  I drag each piece of thread repeatedly across a piece of wax before threading and sewing.  (I use cotton because I have it in abundance.)  I used a random mix of green and brown pine needles.  The ones that are green were dried in the dark under my bed to preserve their color.  They will, of course eventually turn brown very slowly (especially if direct sunlight is avoided).  

I used the V stitch for most of the body, and for the first time the Fern stitch as a trim and decoration.  I concentrated on technique and consistency of the stitches.  Both of these stitches were chose because I wanted a very firm basket.  It seems the more legs on the stitches the firmer the basket. 

 I wrapped the little handles also.  When the basket was complete I popped it into the microwave for 45 seconds to melt the wax off of the thread as it tends to look chalky if I don't.  It was just enough wax to make this basket hold its form without any kind of wobble or sloppiness at all.

I have not done any baskets in almost a year, so these two have been like relearning the techniques.  I have very nice tools and such in storage, but had to use what was on hand as I couldn't get to them.  I always just try to keep in mind that most of the arts/crafts we do today, were originally done hundreds of years ago without the modern conveniences we have access to.

Even though I absolutely love the blue and green basket, this one is probably my best to date.  The stitches are remarkably symmetrical (very difficult for me as I am certainly no seamstress) and very firm.  

I am keeping this one!  I am even thinking of somehow incorporating a small pin cushion into it.


A little update...this one was gifted to Kraftymax's hubby for his birthday.  I think they make great places for anyone to empty out their pockets at the end of the day.  He seemed adequately impressed with the fact that it is made from pine needles.  Happy Birthday Daddy K.

Wednesday, January 25, 2012

Pine needle basket for Steve.

January 20, 2012

I spaced my stitches too close together on this one about half way through it.  Took longer than it should have to finish it as a result.  It is nice and firm for sure, but it seems a little busy to look at for my own liking.  But here it is...


Please note that my posts are somehow out of order.  You are seeing the finished product before the 'process' posts.  Instead of rearranging my entire blog I have just left it as is.  Please forgive any confusion.


Wednesday, January 18, 2012

Purple and blue, brown and yellow!

January 15, 2012

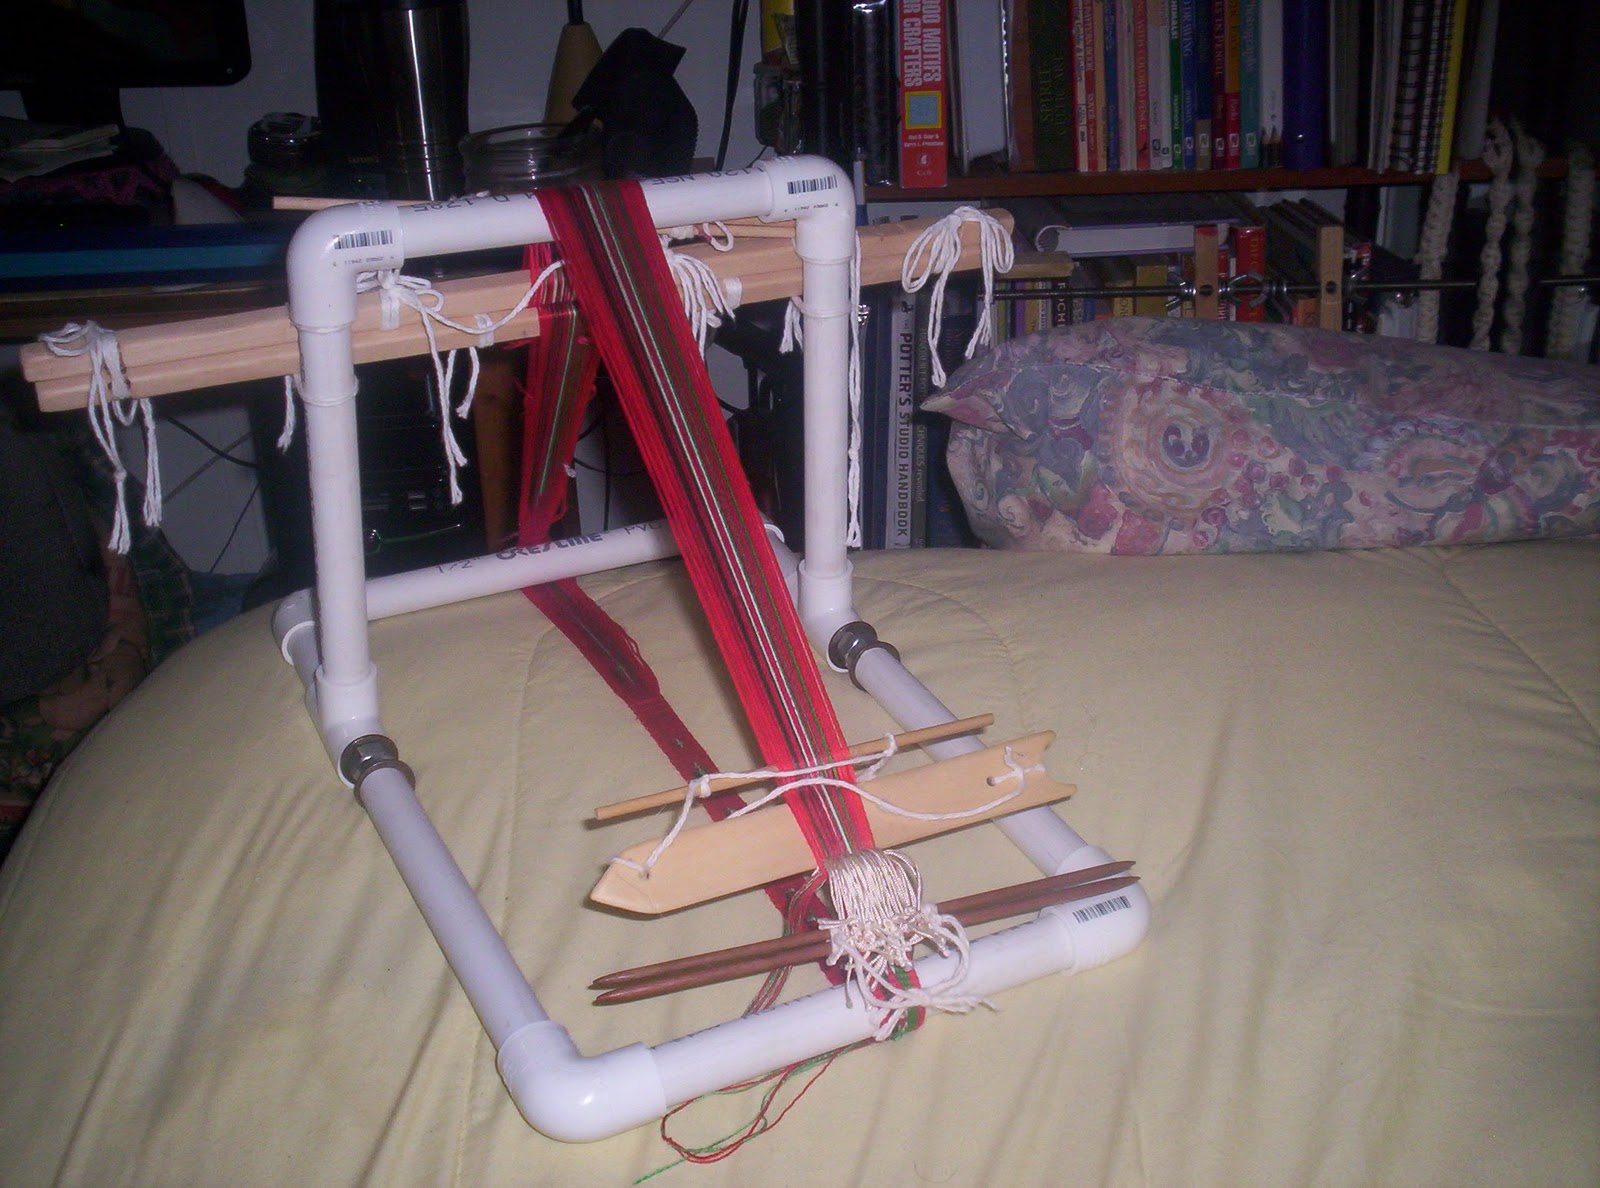
Just a shot of a couple of more pieces that were done over the course of my healing (in December).  The yellow and brown one was done on the pvc pipe loom, and I forgot to take pics while in the process.  Here is a shot of the loom with the bell pull piece on it, in case you haven't seen it.


It is rather labor intensive, in that I make a backstrap warp, mount it onto the loom bars and then wrap them around this frame and lash them together.  If you look closely you can see the wooden loom bars up near the top (I am almost done with this piece in this pic).  You can also see the threaded rods inserted into the pvc side bars for tensioning.  Works great! Rotating the warp when I can no longer find enough space to weave is a bit of a pain, but since this shot I have worked on that problem also.

But as usual, I digress.


Here is the brown and yellow piece I did on the same loom.  The yellow is called Maize and it is #3 mercerized cotton crochet thread, and the brown is #10 in Russet.  I love these colors together.


I see a day of sewing in the near future!


This one was done on the backstrap and gave me fits.  I had a really hard time winding warp with a bum shoulder.  It will probably just be a table runner.  Too wide for an envelope pouch, but might work as just a tri fold ....we'll see when I break out the sewing machine.


Wednesday, January 11, 2012

Red, white and blue for 'Captain America' !

January 6, 2012

New backstrap piece.  This one is a plain weave, 4 ft. long piece with 90 ends.  It will be made into either a belt for my 7 yr. old friend 'Monster' or maybe a pouch he can hang from his belt!  I haven't quite decided yet!

I put it on the backstrap knowing it would be 'easy peasy' and not hurt my shoulder to work on it.  Wider piece are still difficult.  So far so good.  If you look closely at the lower left hand corner, you can see that Wiggles little foot, she still keeps a sharp eye on my weaving skills. 


Simple, but striking non the less.

Edit:  So I am going for a little pouch that hangs on his belt.  Here is a few pics of it pinned together.


Remember this is just roughing it and theorizing.


Here you can see at the top I have created a 'loop' to slide his  belt through.


I called his mother and got some belt measurements...I certainly hope it works.  Wish me luck.

Wednesday, December 28, 2011

Creative mojo definitely broken...except for the pine needle coiling!

December 13, 2011

I am so bored, nothing creative is working AT ALL!!!!

UPDATE:  Well some of it is working...sort of...the socks are coming along nicely, except I am bored with them.  I have one heel turned and now for the next one.  I promise to post pictures soon.

The shoulder injury gets a little less painful each day, Thank goodness, but the weaving still hurts me and sooooooo...I have picked up my pine needle basket weaving again!  This I can do sitting in my recliner with very little physical pain.

I went to Jacksonville to spend a day or so with my friend Max and took my newly started basket with me.  I weaseled her into taking me to look for pine needles too.  We actually found some fallen branches and so the gathering was actually pretty easy.  ALOT easier than picking them up one at a time from the ground for sure.

Then as we sat amiably, she beading and me coiling my pine needles, I wondered aloud who would like a basket made of green stitches.  Of course she said "I would" and it began.

She bought a couple of my baskets in the past, and I didn't realize that she liked them that much.  hmmmmm!!! So in the course of the conversation we decided on a centerpiece, maybe like a fruit bowl.  It would have an 8" base and it went from there.

So I have taken a few pictures for you. 

It starts of with pine branch slice and myrtle green #10 mercerized cotton crochet thread (I already had it on hand).  Later I will be adding in some Royal blue.  Here is a peek.

First de-capped pine needles.  These are shorter pine needles than the ones I used to get in GA.  But they work o.k.  These are ready to go.  I am using them dry as they didn't need to bend overly far to accommodate the pine limb slice, my friend Buzzy did the slices and the holes for me.


Here you get to see the entire set up.  One container for the pine needles themselves...this is because there are times when they have to be damp.  The other is for things like my needles, thread, scissors and such. 

A little tip for any of you who are going to do pine needle basket coiling.  As you stitch, you have to tug the stitches nice and firmly tight, or you will have a soft/sloppy basket.  In doing so you hands tend to get sore, sometimes the thread will cut you, and of course the needles do poke you at times.  Both can be quite painful. 

I discovered when I did coiling the last time that gloves can be very difficult to work in, so the hunt was on.  I couldn't find anything that worked like I wanted it to and let me still feel what I was doing.  So I improvised, I got a pair of 'Playtex' cleaning gloves and cut off the long arm part, and the tips of the fingers. WALA!  Perfect!  I can feel what I am doing, the gloves don't slip (I actually found them in size small for my LEETLE hands) they protect beautifully, they are reasonably priced, and easily found.  Can't beat that right!  I don't have pictures for this post, but will have some up for you of the glove very soon.

I am not sure if you remember, but I actually made the pin cushion also.  It is steel wool covered with burlap and placed in an old cheese tin.  Large and tough and stable!


Here I am at almost 8" and I am started off with double strands of thread, one blue and one green.  I found that I kept popping/breaking the single stranded green.  #10 is a little to fine I guess, even though I have used it successfully in the past.  I do run it along an old piece of vanilla scented candle wax to help with this.  I also have some nylon and hemp to try for the next basket. 

I have used #3 also and I definitely like it better than the #10.  If I am going to work so hard to make nice neat evenly spaced stitches I want them to show a little more than these do. ;-}


And here you can see I have started the side walls...you may even be able to see the royal blue in with the green.


It is now 8 1/2 in. wide and 1 1/2 in. tall.


So this is what I am up to for now folks.  Stay tuned, as the basket progresses I will post pics, and I will definitely be finishing the socks.  Especially since the first one fits so well. 

Wednesday, September 14, 2011

Pencil bag for Alissa!

August 29, 2011

My current project.  Just kind of wingin' it.  

My friend Alissa, a full time college student, full time Home Depot employee and mother, asked for a pencil pouch.  Of course we all know I don't need a reason to weave, but it is soooooo nice to have one.  LOL

So I had her pick the colors from my stash that she wanted and I must say that I love them together.  The warp is 36" and 146 warps wide.  Used #10, so it is only about 2 1/2" wide.  

Practicing on the different techniques, the silly scroll in 'warp floats galore' took me most of the day...I should have done a few more piece's with the technique a few months ago.  It's like learning it all over again.

This is what I have so far.  No particular design factors in mind, I just want it to be unusual and interesting for her to look at.  Maybe even to catch the eyes of some of her fellow student friends, and my old buddies at Home Depot.

At this point I think it will be my usual envelope pouch, just long and narrow instead of the more square version.  I will definitely be getting out the sewing machine soon.  I also need to put together the little purple peace sign bag for my friend Aye!


Wednesday, September 7, 2011

New set up with a copper pipe loom.

August 27, 2011

I am not sure if it is because of the new digs (home I am living in), the move itself or if I am simply having another creative slump...but nothing seems to work of late.  It has been very frustrating.

I do have to admit though, that I have a few more things going on in my life right now also.  These may be a bit of a distraction.  I am of course working, even if it is only a few hrs. a week.  I have also been re-acquainting myself with old friends now that I am back at home in FL. (a social life, go figure).  I have also been walking and doing some bike riding, I am determined not to be housebound and if it means I loose a few pounds also, then all the better.  But, as usual, I digress.

I still haven't found a satisfactory place to hook up the backstrap.  Even when the dresser worked, I couldn't sit in my recliner as I am accustomed to.  That chair and I have a system for tensioning, and for where I place my tools between passes, while using that system.  The set up at the dresser meant using a different chair, and being kind of set in my ways with it, I can't seem to get comfortable with it.  Backstrap weaving never came particularly easily to me and once I got a system down, after months and months of effort, I really struggled here with a new set up.

So I took out the pine needle basket weaving supplies, sort of.  I couldn't find any pine needles on the ground!  Can you believe that?  I am living in beautiful Oak hammock, instead of the pine forest as I have for much of my life.  So I called my friend Buzzy, who lives in the forest (and has tools, he made my tapestry loom years ago) and off we went.  Still no decent needles on the ground, so he cut me some limbs.  So for now the needles are outside drying.

I also cut some new-growth palm and tried spitting it and coiling with it.  Don't really care for the whitish color, or the lack of pine smell.  I also like that the pine needles are smaller (smaller in size here than in GA) and compact for space in my work area.   Palm fronds are larger by far.  

So, now I needed some centers for starting the baskets for when everything is dried and ready.  We sliced two tree limbs, one Pine and the other I believe is Aspen, and Buzzy drilled wholes around them so I now have them curing in a window sill.  For now everything is curing, so no pine needle basket weaving.

Back to the loom...

Part of the problem I had with the pipe loom was the fact that my threaded rods in the sides (for tensioning) were waaaayyyyyyyy too long.  My spare set had nuts welded to one end (that is another story entirely) and that end would not fit inside the pipe, and of course they were too long also.

Got my roommate to dig out his hack saw and help me cut them to size, which also eliminated the nuts.  Wala!  New threaded rods, no cost to me.  

Then I took the backstrap loom, with a warp for double weft double weave already on it, and wrapped it around the pipe loom frame.  In this case the warp was a little on the short side so I had to improvise (the next one will be the appropriate length and I will simply tie the warp bars to each other on the back) on how I mounted it to the frame.  Lots of lashing cords.  Basically it is alot like using a Navajo loom, but nicer in that it has tension rods in the sides.

Then I tried to lean it against my weaving table, and it kept pushing the little table away from me...hmmmm...Brainstorming.....hmmmm....I placed 2 large C clamps on the far side of the table, and laid the far end of the loom on TOP of the clamps.  This gave me a slight slant to the loom, I like that.  I pulled the table closer to me and put my feet inside of it, as I always have to keep it from moving around while weaving, pulled it up to my lap and WOW...I think this is gonna work.

I did have to slide the loom to one side of the table so that I could c clamp one side of it to keep it from moving left to right, but OH WOW, I now have a place on the right hand side to lay my tools!  This means I don't always need the ugly yellow tool box right beside me either!  This is great, because the tool box is large and bulky, taking up valuable real estate in my room.  

I may even be able to mount a clip on lamp to the table.  Heaven.  Now I only have to push back the little table when I want to stand up, and with two little spoiled dogs, one does need to stand up fairly often.  LOL

Now to try a little bit of weaving and see if it works as well as I think it will...And of course I did take some pictures for you viewing pleasure.


Here you get to see the angle.  Notice the red walls in my room.  Not my choice, remember that I rent the space and it used to be a teenager's room.  LOL

 
Front view.


Here I am sitting in the recliner, feet in the middle of the folding table and some weaving goin' on!

When I pull the table up nice and close the weaving itself is in just about the same spot it would be in if I were strapped into the backstrap loom.  I am so happy!  I even have a place to lay a mirror on the table so I can keeping checking the back for mistakes in the double weave portion.  Remember the center is dbl wv that is reversible...solid brown on the back side not the same variegated you see here on the top center.

So friends, I am going to finish this piece after all.  Still a bit of a struggle because the dbl wv portion is #10 cotton crochet thread.  I just don't like #10 for dbl wv, too hard on the eyes.  Too tedious and too much counting for too little reward in my humble opinion.  

I am also thinking that if I want to, I should, should mind you, be able to unwrap the warp, take the pipes apart, put all of it into a backpack and make it a portable situation for when I want to take it with me on my bicycle.  I am determined to independent and portable, and under my own steam for transportation.  If the Navajo Indians can do it so can I!

Monday, September 5, 2011

New project, Double weft double weave.

August 16, Tuesday

This piece is a bit of an experiment.  I am using #3 mercerized cotton for the outside plain weave portion, and #10 for the center double weave area.  I want to see if this will make the ledge between where the two meet less acute.  

This means that I am doing double wv in the dreaded fine yarn... :-{ which we all know isn't my favorite thing.  But I happen to have alot of #10 and I need to just get over it.  There is a sort of variegated #10 on one side that I have been hording since Christmas.  I am hoping to get an interesting effect.

Here is the 30 in. warp laid out on my bed being secured to the warp beams.


Just a close up of the colors.


This is the side I am looking at as I weave.


Here is the backside.

I haven't really decided if I want to do pick up designs yet...maybe I will just let the variegated yarn speak for itself...

Monday, August 29, 2011

Pipe loom project!

August 10, 2011

Through no fault of switching this warp from a backstrap loom to a pipe loom, I had a lot of problems with this it.  Threading sequence issues mostly.

It seems the warp was a little wonky tension wise also.  I find this to be problematic, especially on a frame/pipe loom.  In other words, one side of the loom is slightly longer than the other.  This means that to get even tension all the across the warp, you must crank one side of the loom up higher/tighter than the other.  This creates an angle in the top bar, which makes the warp try to slide to the side that is lowest, simply by gravity.  If you tighten it up enough to prevent most of this, it is too tight to warp face weave comfortably.  If it loosened to the point of comfort, on side of the warp is baggy and troublesome.  It is alot easier to have floats and missed threads in a very loose warp.  Lots of room for errors in general.  Plus it will look different from one side to the other side.

So here are pictures of what I could salvage from the project, be assured that I am back on my backstrap.  Working diligently on getting a workable system going again.  Pictures will be coming soon.

As you can see they are small and I sacrificed alot of the warp by starting over three times and trying to work out the 'kinks'.  This is the front side.


If you look closely you will see the back side of the one to the far left.  The green is double stranded with two shades of green, the white is single.  Notice how it made the white threads pull to an angle, kind of like little v's to make the design on the back.  Interesting.  I kind of like it.

These pieces have no particular destination at the moment, they are just in my box of things that will probably be gifted out, maybe even at Christmas.


Friday, August 26, 2011

Conversion from backstrap to pipe loom.

August 7, 2011

Previous set up in my new home with the backstrap loom.  Notice how I have to brace the chair with my feet to keep it from coming into my lap.  Painful on my hips to sit with my legs straight out after a couple of hours weaving.  Probably because I have to keep pressure on the chair to keep it from coming over into my lap.


So I went to storage and got out my Archie Brenan Pipe loom.  Laid the backstrap on the bed (it was already totally set up and secure), slid out the loom bars.  Slid in the pipe loom between the warp layers (this is a rotatable circular warp).  Then extended the loom to the correct tension with the nuts you see on the threaded side rods.  Easy peasy.  No more hyper extended legs, and alot less hip pain. 

Now I simply lay the far end against a table in much the same fashion alot of folks use their rigid heddle looms.


The two Home Depot sticks are my lease sticks and have been pushed to the back side of the warp.  They are usually just to the backside behind the top beam as stoppers on this circular warp.  Unfortunately I had a few issues with this warp and moved them further down so that I could organize the threads.  All of the problem areas are to the bottom of these sticks and will be fringe at the end of the weaving.  It was the only way I could keep from trashing this warp of very fine threads.  My heart is definitely not in this one.