Did you know?

A "Pandula" is a flower which blooms only in one's imagination.

Pages

Showing posts with label Pebble weave success on a backstrap. Show all posts

Friday, September 2, 2011

Pink pebbles!

Monday August 15, 2011

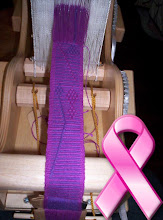
Finished the pink pebble piece some time last week.  Not happy with it at all.  I still find 'pebble weave' fiddly and difficult to setup, and I haven't put alot of effort into a design motif because I dislike having to reach through to the bottom shed to do the lifts.  This technique does give a double sided/reversible fabric, but I don't have much need of double fabric in the first place, and if I do I prefer double weave because of the solid background.

I decided to finish it out with just plain stripes, it is off center and off balance at both ends.  It seems that when I don't enjoy something it doesn't turn out as well as I would like.  Surprise, surprise...lol.

Pink pebbles.


Notice how where I doubled the weft in the stripes, it changed the weave considerably, but not the width of the fabric.


I even got hour glassing on the pebble design...different weaves, different results in the same piece.


Here you can really see the hr. glassing.  The piece is actually a consistent width all the way from end to end.


Wednesday, August 31, 2011

New pebble weave warp!

August 11, 2011

This warp did not come easily!  Not only did I have threading problems and have to manually re-pick the sheds, but I ran out of heddles, twice.  So TWICE I had to stop and make more.  Basically it took me all day just to do the heddles. 

As this is only my second pebble weave project, I am still happy with just the pebbles.  No designs yet.  I like it so far.  I forgot to take pictures of the other side, but will do so soon.  It is a reversible weave.  The other side is light pink with dark pebbles, opposite of what you see here.  This is a perle yarn, and as a result has lots of shimmer.  Difficult to take good pictures, so I hope you can see it reasonably well.  I will work on better pictures.

You also get to see a picture of how I am tying up in the new digs.


Unfortunately the very end corners of the window sill (there are 3 huge windows) are the only ones deep enough for a C-clamp to catch and hold.  So I am using only one fixed point, another learning curve to be sure as it wants to wobble a bit.  The red piece that you see is a piece of rubber to protect my friend's window sill, the clamp is also red so a little difficult to see.


Friday, August 19, 2011

Dana is doing pebble weave!

August 2, 2011

I have kept in touch and collaborated with Dana on Pebble Weave!  This girl is a whiz kid when it comes to this weaving thang!

Monday, July 25, 2011

My second 'pebble weave'!

July 1, 2011

I tried all kind of new skills today.  I warped a circular warp on my new warp board.  That little board works like a charm.  I used a new method of lease sticks, also worked like a charm.  I made three sheds, one plain weave, pebble one and then pebble 2.  I only had one tiny mistake...two crossed warps in the same shed, fairly easy to fix compared to redoing the entire shed system.  And here are the results.

Here is the new warp board with my circular warp on it.  Please notice how straight the pegs/bolts are.  Absolutely no leaning (which means consistent tension)!  I warp tight too, so this is a wonderful wonderful thing!


Here you get to see my new 'lease sticks'.  The metal rings make this so much easier than tying bow's with string.  Less waste also.  Another plus.  These are just shuttles that I made years and years ago from Home Depot paint sticks.  Free is good too.


Here you see that I am all warped up and ready to go.  The lease sticks are now on their side and tied to one another.  This keeps my plain shed wide open, very easy to get the sword inside.  You also see string heddles on pebble shed one and pebble shed two. 

I am tied onto the dresser, but once I am off and running my feet will brace the stick that the blue band is tied to.  This is why I did the circular warp.  It is actually twice as long as what you can see on the top.  Now, when I have woven as far as I can reach, I will rotate the warp around so that I can weave some more.  So I never have to roll up the woven part closest to me.  This way when I want to I can brace the furthest bar with my feet and the warp never changes length.  It just rotates around the bars.  This makes me part of the loom and self sufficient.  I won't need to try out what to tie up to a sturdy fixed object (it needs to very strong for those who are not aware), which can be difficult to find at times.


Here you get to see my nice clean shed! 


Here you get to see the 'Pebbles'!  My head is gonna bust I am so excited.