Did you know?

A "Pandula" is a flower which blooms only in one's imagination.

Pages

Friday, November 28, 2014

11/28/2014

Here is a picture/print that I drew in 2009. It was a tutorial in a book and I just put my own spin on it. 


It's printed on photograph paper, hard to get a picture of it because of the shine, but I think you get the general idea. I'm going to try to duplicate it on a piece of the Cedar stump that I had sliced up…


It feels a little bit like cheating since I've already drawn it before. Usually everything I draw is one-of-a-kind but I always loved this photo.  The original (hand drawn) anyway so let's see what happens.

Monday, November 24, 2014

11/24/2014

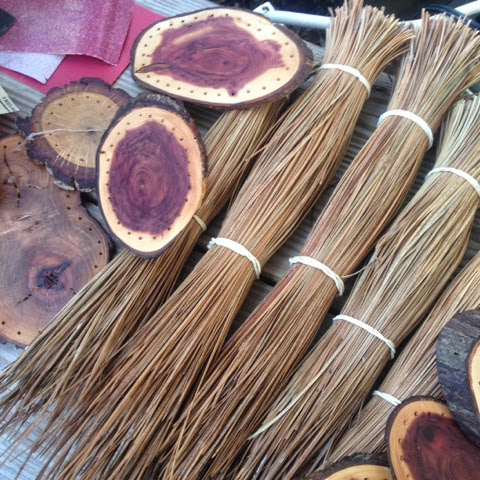
This piece of wood was put through a planer for me, it was part of the stump that my vise for spoon carving is mounted on.  I have a whole stack of it I just kind of been looking at it waiting for her to tell me what it wanted to become when it grew up.

I love to draw even though I do not consider it my strongest art form.  I'm trying to get better at it though and I do love working with the wood. So since the wood has been killing me physically I decided to once again try to draw directly onto the wood.  Thus combining my love of both and giving me the opportunity to improve my drawing skills.

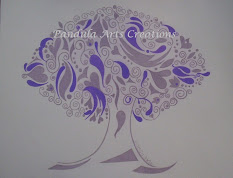
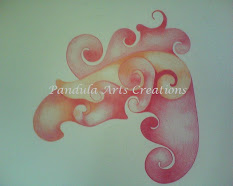
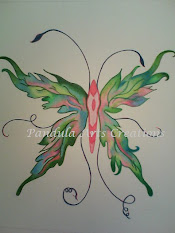
It started out looking like this…


Then this...


Hated it!!! And so then I discovered the magic of sandpaper. Sanded it clean and started over.


Then it looked like this…


And I liked it well enough. Then I started to apply Ink to it and it began to look like this…


And again I hated it. The vine part but the flowers are supposed to be hanging from was just too thick. I also discovered throughout this process that it sucks the life out of a micron pin and sharpie's.  And of course the larger sharpies bleed into the grain of the wood leaving no control whatsoever throughout the process of drawing. So once again I got out my sander.

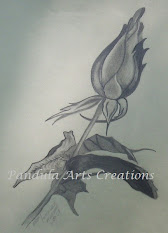
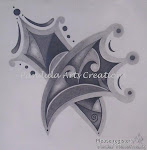
And it looked like this…


And now I like it a lot. I learned a lot. This is done with nothing but a ball point pen. I definitely have to get better about line thickness. But I can live with that.  

I'm going to put screw eyes in the top of it and maybe hang it from a beautiful black satin ribbon (maybe).  I'm also going to polyurethane it to death.  I want it nice and shiny. Not sure yet though if I'm done drawing so stay tuned and you might get even more changes!


Friday, November 21, 2014

11/21/2014

This week the wood won most of the time.

After my hands got all healed up, which took days and days, I finally decided to get outside on this beautiful sunny Florida day and work with some wood.

Before the cold weather came back, or rain of course, I decided to get outside. The first thing I did was sand, drill, burn my initials/put my on them, and oil 14 pieces of wood for the basket bottoms.

Of course I had to get the Pineneedles ready also… Here's a few shots.


And one small sayce spoon of Juniper.


I have two more rows and I will have completed a total of 4 baskets also this week.  

This one has Live Oak in the bottom.


I'll have to go to the amphitheater farmers market tomorrow just to get to sit and rest for a little while LOL. Talk to you guys soon.

Thursday, November 20, 2014

11/20/2014

I completed another tiny basket. 

Went with a little bit different shape than usual also. This one is yellow and fuschia.  It has a Live Oak Center.


Such a little cutie!

It looks like the sun is up so I think I'm going to go outside and do some woodwork wish me luck!   I still don't have quite as much consistency with the woodwork as I do with the baskets, kind of a crapshoot every time. Lol

Wednesday, November 19, 2014

11/19/2014

How about a live oaks Center stitched with yellow and red?


So far just yellow.


Tuesday, November 18, 2014

Tuesday

Second day of the week and I already have three projects done.

Two baskets at one birthday present. 

Here's the second basket, it gets the "Wiggles" seal of approval.


Monday, November 17, 2014

11/17/2014

I know what young lady that has a birthday coming up real soon that really loves peace signs. The bedroom is covered with him so I think she might like this…


Meanwhile, the newest basket is coming right along.


Sunday, November 16, 2014

11/16/2014

One little tiny basket complete, getting  my work off to a good start already this week.


Live Oak center and glass beads with metallic finish.


Then I started another one, this one will be a lot bigger. I haven't been doing very many large pieces but I have one I'm going to send out for a spoon swap.  So I need another one to replace it on my table, here's the start. Stitched with green waxed linen with a Juniper center.


Friday, November 14, 2014

11/14/2014

People often wonder why Pineneedle baskets are so expensive.  Keep in mind that I do not factor in the time whenI go out and pick up my Pineneedles by hand one at a time in the rain sleet snow or hail here in Florida. Emphasis on heat!!!  Or when I go into the forest looking for tree lambs to slice for the bottoms. I don't factor in the time it takes me to sand the wood a drill holes in the wood and polish the wood with my beeswax mixture the only time factors that I taken to play for the actual needle and thread stitching time.

So that being said, I started this basket this morning at 5:30 what I was drinking my coffee and just finished it right at 11 o'clock. It measures 4 1/2 in shoes across the top one way 3 1/2 inches across the top the other way and it stands 2 inches tall. It's a $30 basket so I sat here for six hours working 
on this it.  So $30 divided by six hours makes my hourly rate add around what five dollars an hour 5×6 is $30. So imagine if I did factor in gathering my supplies, how much I would have to 
ask.  

It is a tiny basket but $30 is an extremely reasonable price for it I have seen baskets the size priced at over $100 more than one time.

I like to make my baskets affordable.  I want people who cannot afford to pay three or $400 for a piece at the galleries to at least be able to have a piece of handcrafted art of some sort even if it is tiny.

And it is a very very cute basket if I do say so myself I think I was feeling a little bit Christmasy you tell me…


Thursday, November 13, 2014

11/13/2014

One tiny basket, one tiny bowl, and check it out I made some Christmas tree ornaments!


Thursday, November 6, 2014

11/06/2014

Lately, I have been searching for an artform to supplement my basket work. 

You see after enough years I was beginning to be a little bored with doing just baskets. Sooooo I've been playing around with Pineneedle bracelets and woodwork. 

And can I just say working with wood makes the arthritis in my hands just scream.  And I mean really scream, wake's me up in the night in pain.  I've never really had that happen before. So I think what I'm going to have to do his pace myself and only do wood on occasion, it really stinks but I have to listen to my old lady body I guess.

So yesterday I did two pieces of work with the wood, and one Pineneedle bracelet. Today it's Pineneedle work only. And I have found a comfort zone that I had forgotten can I just say ahhhhhhhh!


It's just the little one done with my usual Juniper but it just flows so nice and easy.  I'm enjoying the process of it, nothing really challenging me, just being successful from start to finish.

Beautiful feeling if I do say so myself it makes me feel whole.  :-}

Wednesday, November 5, 2014

11/05/2014


I have completed three projects today. The first one is another little red bracelet.


I also did another spatula/spreader, of 
course it's made out of Juniper/Cedar.


There's a tiny little spoon there also.


That makes six completed project so far this week and it's only Wednesday. I'm thinking I might need to do a basket here and there...

Monday, November 3, 2014

11/03/2014

One tiny little customer bracelet done in black and silver.


And one handcarved Juniper spatula.

This is my first time carving anything where are used absolutely no power tools. No Dremel. no electric sander. 

I used my knife as a scraper for the finish and of course then I oiled it with mineral oil. 

I was specifically going for a rustic look I don't want it to look store-bought I want it to look handcrafted and this one just really went well.


And now you get to see it after it has been soaked mineral oil.


This one shows how I left a little not at the bottom of the handle. I think it turned out nice.


I still have to do one more bracelet and one more spatula before I can get on to doing just whatever I feel like doing wish me luck TTYL!